12 tips for choosing the right bike for your child

Feb
Putting your child on a bike that fits well and is functioning properly are the two best things you can do to make their riding enjoyable and safe. While coaching skills to children, we see the huge difference it makes when children are on well maintained, properly fitting bikes.
Rather than choosing a bike based on age, the key is to know your child’s capabilities, so you can choose a bike that suits them and enables them to ride well and improve along the way.
Here are some bike set up tips to help maximise the fun your kids (and therefore parents) have on the trails.
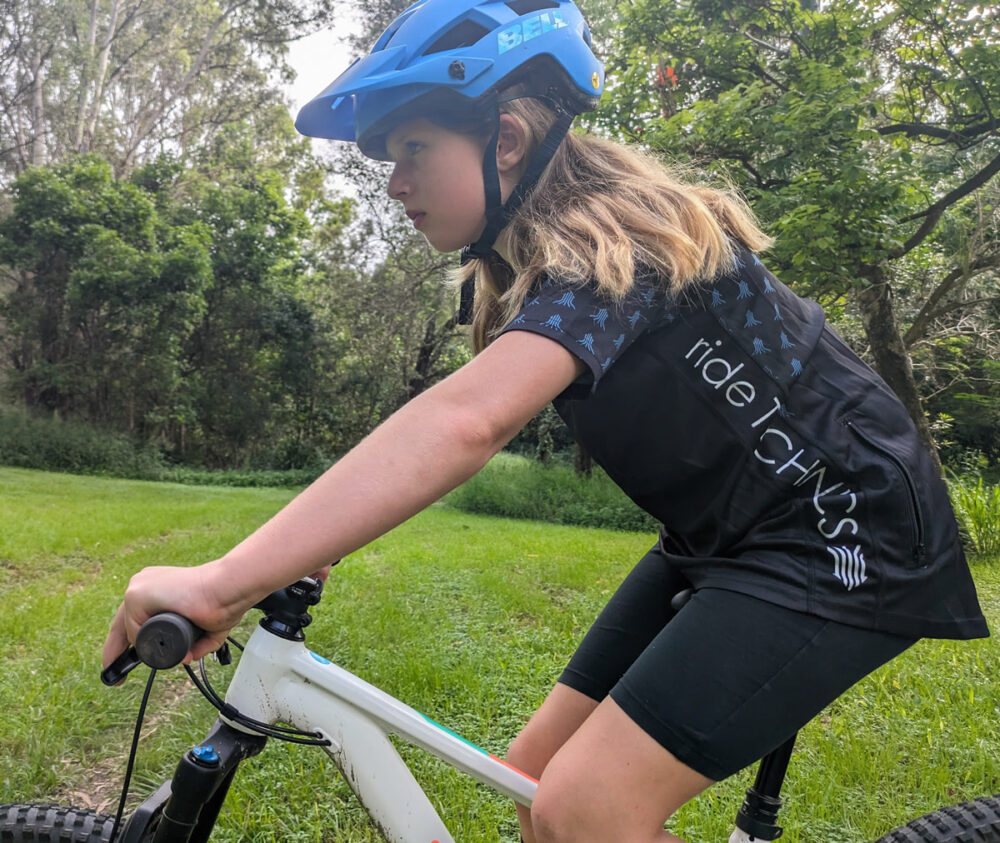
1. Choosing the right size

There is nothing worse than a small, cramped and ‘twitchy’ bike, making riding unpleasant and dangerous. And being too stretched out on a cumbersome long/tall frame is also a hindrance, affecting bike handling and confidence.
Height and stand-over clearance
A common misconception with sizing is assuming riders need to be able to touch the ground with flat feet while seated on the saddle. This method results in a bike that’s too small and/or a seat that’s too low. We teach kids to lean the bike to the side they’re going to step off, rather than keeping the frame upright. This creates clearance over the top tube. If riders swing their leg around the back of the saddle (over the rear wheel), they shouldn’t have trouble hopping on and off their bike if it’s tilted to the side. This method means the frame size, saddle height and bottom bracket height don’t have to be too low.

Reach/length
When coaching kids, the most common issue we see with sizing is the bike being too cramped across the top, from saddle to bars. Riders should be able to comfortably grip the handlebars, elbows slightly bent, but without fully extending their arms. Their arms will ideally be at a 90 degree angle to their torso. Too short is usually more dangerous than too long. Extra length means room to move and a more stable ride. Note that bar width also affects reach, wider bars adding length. Aim to match hand position with shoulder width, or just outside the shoulders.
Seat height
Most kids’ bikes are designed so they ride in a more upright position. They should be able to sit comfortably with legs slightly bent at the bottom of the pedal stroke. However, when pedalling, your child’s legs shouldn’t be excessively bent the entire way through a pedal stroke. One quick reference is to put one pedal at the bottom of the stroke while the rider is seated, heel on that pedal. This leg should be extended, but shouldn’t be fully locked out (slight bend at the knee only).

Regular adjustments
Kids grow quickly and it’s easy to lose track. Therefore, checking the height and length of their bike regularly is as important as maintaining the bike mechanically.
2. Aiming for a light ride
Kids bikes are often heavy, making it challenging to get up hills and perform key skills. Unfortunately though, lighter bikes usually means more $$. Apart from buying higher end bikes, take off heavy accessories like kick stands, overly large saddles and unnecessary items. Light tyres are a good investment, given that rotational weight affects small/light riders more.
3. Good tyres for good trail contact
Some mountain bikes still come with narrow tyres with minimal tread. This makes them less grippy on the trails. The key here is air volume. Within reason, the wider the tyre ‘bag’ (casing) the better, as it helps with traction and absorbing bumps, better than most budget suspension. 2.4 width tyres are usually about right if they fit in the frame/forks. Then run plush pressures that suit your child’s weight. 12-18 psi is usually a good range. As for tread, if the knobbles are at least 3mm deep in the centre and at least 4mm on the sides of the tyre, it’s hard to go wrong with most tread patterns.

4. Forming good habits with flat pedals
Flat pedals (not clip-ins) should always be the first step in any rider’s journey, helping form good habits and keeping things safe by allowing the rider to step off when needed. Pedals are key contact points, meaning that pedal grip is essential. With pedal studs sharp enough to grip their shoes (choose shoes with grippy soles), but not so sharp they cut their shins if they slip, kids should be able to ride comfortably over bumpy terrain. Keep them on flats for as long as possible. Clip-in pedals should only be needed if they start racing or doing extra long rides, given they help with connection at high speeds, pedalling efficiency and power output.

5. Getting nice grips
Being another contact point, grips need to be the right diameter and rubber compound, so kids don’t struggle to hold on. A smaller diameter with softer rubber is usually best, but your child will usually know if they feel good or not. And of course, they need to be the right colour!

6. Brake choice and lever adjustments
While V-brakes can work well enough, modern disc brakes are better, especially if they’re hydraulic rather than cable brakes. The light action and power they offer is hard to beat, especially for smaller hands. But even good brakes won’t be effective if the levers aren’t positioned properly for your child’s hands. Ensure they can brake with their index/pointer fingers inline with the tip of the lever (the middle finger too if they need to use two fingers). This may require you to slide the brakes across on the handlebars to line those up.
Then tilt the brakes so the lever lines up with extended fingers, both inline with the angle of forearms while in a riding position. Lastly, reach adjustment is important, so kids’ small fingers can reach the tips of the levers without contorting their arms/bodies. This is adjusted by turning the small screw/Allen bolt just inside the level, where it meets the pivot bolt.


7. Suspension is not always needed
Front suspension
Cheap suspension is usually heavy and ineffective, especially for lighter riders. Often light-weight rigid forks are better, so children have a bike without a heavy front end. But suspension forks can be handy once speed builds on bumpy trails and features. If you can afford quality air/oil forks that can be adjusted to suit rider weight, it will make a big difference to how your child feels on the trail and the control they have. A worthwhile investment.
Full suspension
As with forks, rear suspension is only worthwhile if it’s plush and is activated by light riders. A good air/oil shock will help kids ride smoothly, but if a dual suspension bike is cheap or in bad condition it may just add unnecessary weight for riding around, without any benefit. Working on skills and using legs to absorb bumps is usually the better option until riders are moving fast enough to need extra plushness.

8. Gears for getting around with ease
While balance bikes and single speed bikes are great for a child’s initial part of their riding journey, once they’re skilled enough to ride up on proper MTB tracks with climbs and descents, kids need a good range of gears for getting around the trails with ease. At least five cogs on the rear and a single chainring on the front for simplicity/reliability. The key is to have a light action shifter so small hands can change up or down easily. Grip shifters tend to be too stiff for kids and often force them into bad positions, so a trigger style shifter usually works best. Check them every now and then to make sure they don’t get stiff due to dirt or kinks in the cables. Replace as needed.

9. Deciding on droppers
As for adults, dropper posts are a great way to aid riders on steeper trails and features, allowing them to move around. Kids are no exception if they can operate the lever without being distracted by it. Added weight and costs are the main drawbacks, but if it helps your child ride with better safety and control, they’re another worthwhile investment.

10. Accessorise for fun
If accessories make riding more fun, get your kids to add streamers, a bell or bar toys. If they’re secured, won’t be a hazard and are reasonably light weight.

11. Deciding on how much to spend
Everyone’s budget is different, so the key is to balance your budget with the benefits of the components and type of bike you choose. Considering the above aspects of bike choice, if you’re smart about which parts of the bike are upgraded, it’s possible to get the ideal bike for your child without breaking the bank.
12. Used or new?
If you know how to spot a well-maintained bike and know its value and are willing to adjust and maintain it after purchase, a used bike (or an online purchase) can be a great option, saving you hundreds of dollars. But if you’re at risk of missing potentially expensive flaws in a bike or don’t know how to choose the right size, it’s best to go to a bike shop. A good shop will help you pick the right size, adjust it accordingly and include a warranty. Similarly with online purchases, if you’re unsure about sizing and which bike to get, ask somebody who knows bikes before committing to a purchase.
Hopefully following these tips will ensure your child wants to keep getting out on the trails with a smile on their face.